KHIKA Workspaces
Contents
Introduction
The purpose of workspaces, how to create them and map users and data to them is explained in another section.
However, from the operations point of view, there are a few more aspects about workspaces which we might need to know.
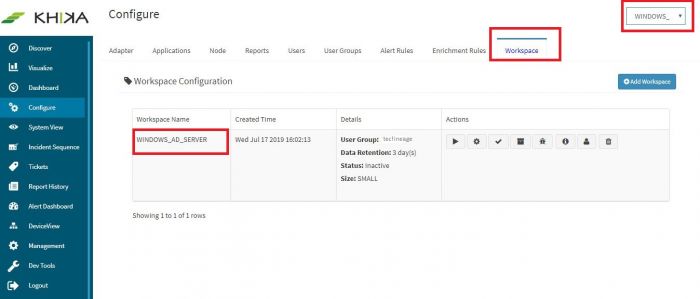
To access Workspace tab, go to the main screen, click the left side menu bar. Click Configure and then click Workspace tab. The workspace details appear for that workspace which is selected in the dropdown on the top right of the page.
It is possible to add and delete multiple Workspaces in KHIKA. You can archive, configure, add, delete, or suspend a Workspace temporarily as per requirement.
Adding a Workspace
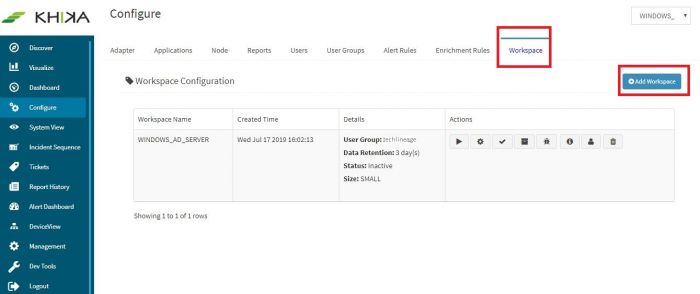
To add a Workspace, click Add Workspace button as shown in figure below.
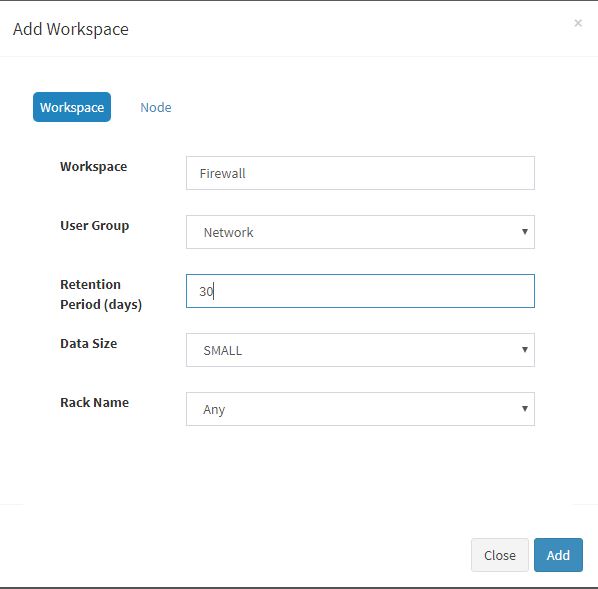
The following dialog box is displayed.
The fields are explained the table below :
| Fields | Description |
|---|---|
| Workspace | Name you wish to give to your new workspace |
| User Group | The user group or team that will be mapped to this workpsace. One workspace can be mapped to one or more user groups. |
| Retention Period | Online data duration required for this workspace. |
| Data Size | Drop down to select from Small, Medium or Large. This depends on the size of data expected in the workspace. For now, keep default. |
| Rack Name | Rack name of elastic cluster where we have to store the data. |
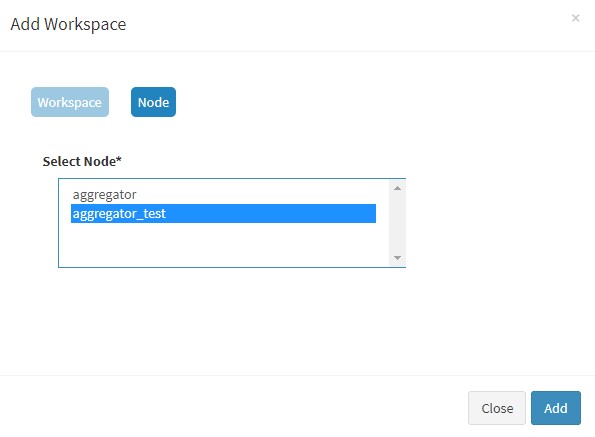
Click on the Node tab in the pop up.
Select our aggregator node – “aggregator_test” and click on Add button. Workspace is added and we get the following confirmation message
Suspending a Workspace
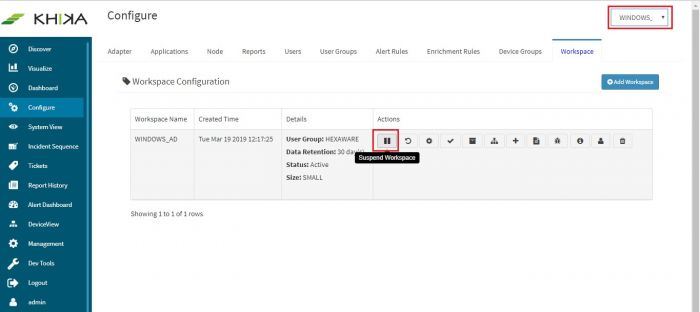
A workspace is suspended if the data collection has stopped for that workspace due to some reason, or relevant devices are disconnected etc.We need to suspend all workspaces before shutting down or restarting KHIKA. To access Workspace, Click Configure and then click Workspace tab. To suspend a Workspace, click Suspend Workspace icon as shown below.
The following message is displayed. Click OK to suspend the Workspace.
Note: When you suspend a workspace, the Data Collection of all the Adapters of that workspace will be stopped. This means, no new data will be imported into that workspace until you “resume” the workspace.
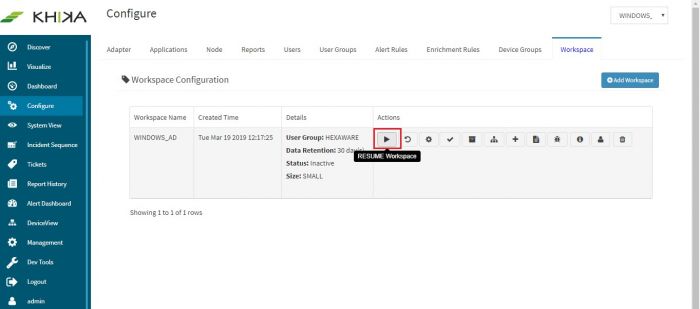
To resume the data collection of the Workspace, click the same icon again, (it displays Resume Workspace). The data collection of the Workspace is now active.
Applying Configuration to Workspace
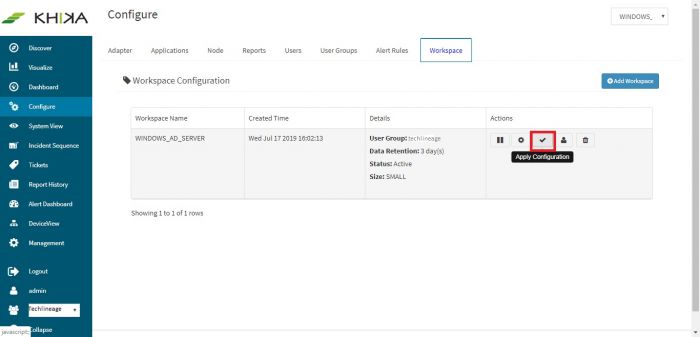
To access Workspace tab, go to the main screen, click the left side menu bar. Click Configure and then click Workspace tab. Whenever you make new additions or changes to the Workspace, such as adding an Adaptor, adding a new Data Aggregator etc, they come into effect to the Workspace only after they are applied. To configure a Workspace, click Apply Configuration icon as shown.
The following confirmation message is displayed, and the configuration is applied. Click OK.
Archiving a Workspace
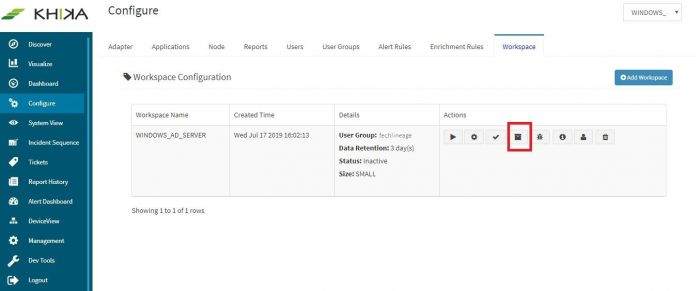
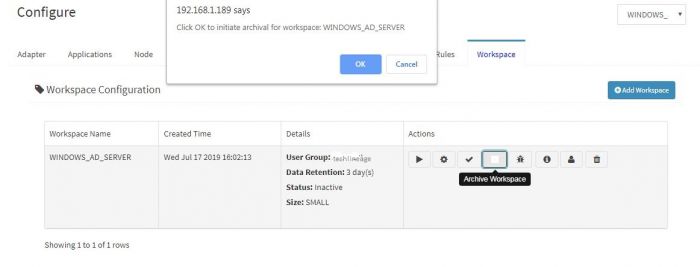
Click Configure and then click Workspace tab. To archive a Workspace, click Archive Workspace icon as shown.
The following pop up is displayed.
The following message is displayed. Click OK to archive the Workspace.
A message is displayed “Please suspend data collection before archival.” This means you need to suspend all incoming data collection first, to complete the archival without any disruption.
Click on Suspend Workspace first and then click on Archive again.
We get a success message on completion.
Adding Data Aggregator to a Workspace
This is explained in detail in KHIKA Aggregators section.
Adding Adapter to a Workspace
This is explained in the KHIKA Adapters section
Defining and Configuring a Report
This is explained in the section KHIKA Reports
Deleting a Workspace
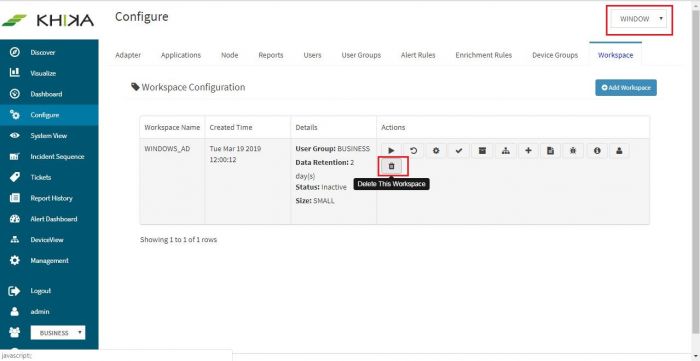
WARNING: By deleting the workspace, you will lose all the data and configuration of that workspace. To access Workspace tab, go to the main screen, click the left side menu bar. Click Configure and then click Workspace tab. To delete a Workspace, click Delete this Workspace icon as shown in figure below.
Click OK to confirm the deletion as shown below.
When you click on OK, the Workspace is deleted.
The next section explains the data enrichment feature in KHIKA
