Getting started with KHIKA
Contents
Introduction
When setting up and configuring KHIKA in your organisation network, you need to perform few steps and shall find this page helpful for the same. For more information on KHIKA components you can click here.
KHIKA Virtual Appliance
KHIKA is available as a Virtual Appliance which can be provisioned on your organisation’s VMware platform. There is at least one KHIKA core app server VM. In addition, there can be optional collector nodes or KHIKA aggregator VMs, one at each location where the data sources are present. For more information refer to KHIKA Data Aggregator.
Download the KHIKA Virtual Appliance in the form of a .ova file on your VMware platform.
Pre requisites for KHIKA VA
We recommend following hardware resources to be allocated to the KHIKA VMs for optimum performance.
KHIKA Central Server
CPU= 16 vCPU
Memory = 64GB
Disk1=500GB (for KHIKA Application, OS etc)
Disk1 = 2 TB (To begin with for storing KHIKA data.)
Network= Fast ethernet with static IP
OS: Bundled with KHIKA Virtual Appliance
KHIKA Aggregator
CPU= 16 vCPU
Memory = 16 GB (to process incoming volume of data with high speed)
Disk1= 500GB (for KHIKA Application, OS etc)
Disk1 = 500GB (to store immediate data and some buffer in case of connection loss)
Network= Fast ethernet with static IP
OS: Bundled with KHIKA Virtual Appliance
Minimum Hardware sizing you require depends on the volume of your data. You can refer the table below :
| Data expected in GBs per day | CPU Cores | Memory in GB | Disk |
| 10 to 24 | 8 | 16 | 500G SSD or 15K RPM |
| 24 to 48 | 12 | 64 | 500G SSD or 15K RPM |
| 48GB and more | Needs customized distributed architecture (contact sales for Professional Services)
| ||
Import the KHIKA Virtual Appliance
Download or transfer the KHIKA VA .ova file on the required server. This section considers a VMware Workstation environment in which we shall setup the KHIKA VA.
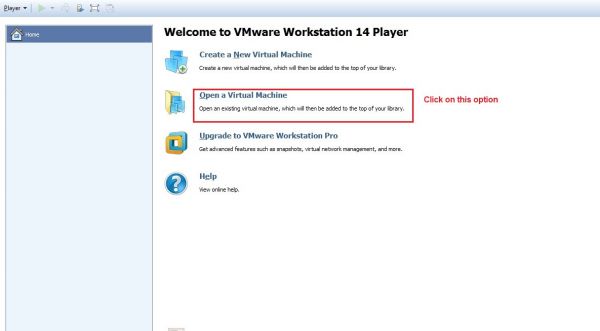
In the VMware workstation, start by clicking on “Open a Virtual Machine”
A browser window opens which prompts you to select the .ova file, the KHIKA virtual appliance which is present on your local machine.
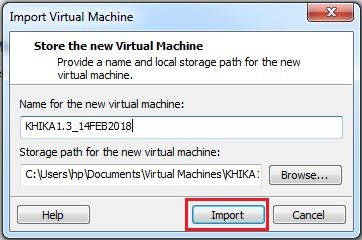
Select the file and click Open. Another pop up window appears where you can rename it if required, or select another file by clicking on “browse” again. Verify the details and click on Import.
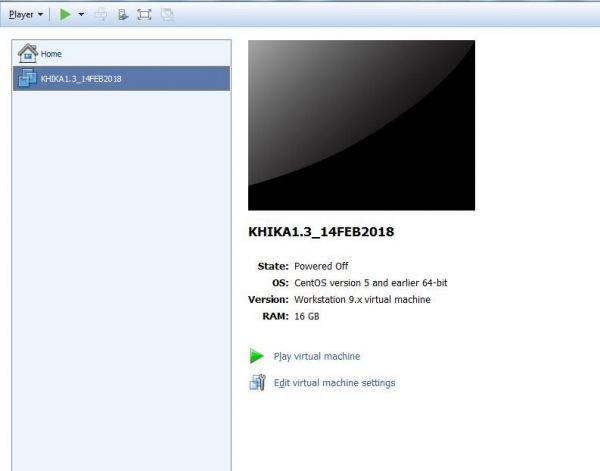
After the .ova file is successfully imported, it is seen as follows in the VMware workstation
Allocate Resources
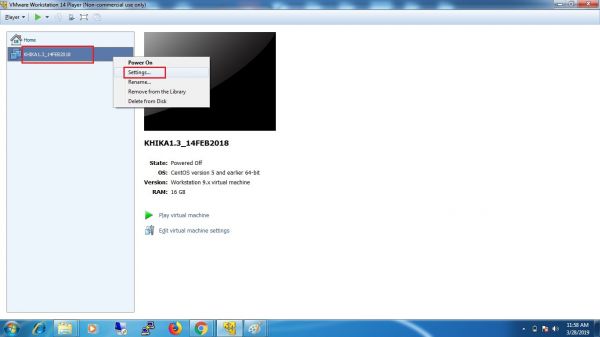
In the left panel, we can see the name of our virtual image. Right click on it go to Settings.
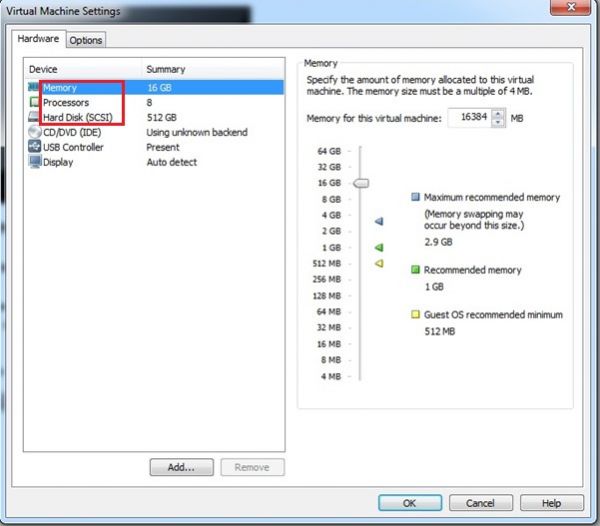
Following window opens with options to allocate compute resources to this newly created virtual appliance.
Click on the options Memory, Processors, Hard Disk one by one and on the right side of the window, allocate enough resources for the selected component.
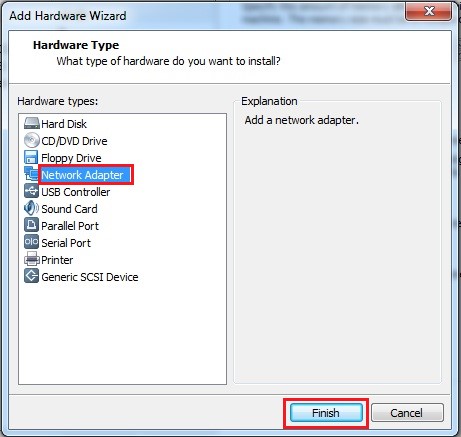
Click on Add button in the bottom, for additional resources. In the new pop up, select Network Adapter and click on Finish. Network Adapter is required for the VM, so that we can connect using an IP address to this VM.
Please ensure the hardware pre requisites discussed in the section above, are present on your server, so that it can be allocated to the VM.
Boot the Appliance
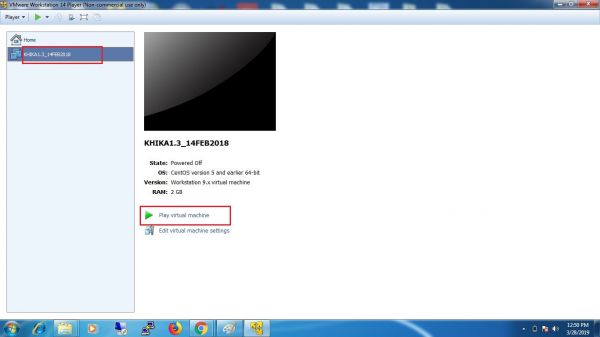
Now click on the option “Play virtual machine”
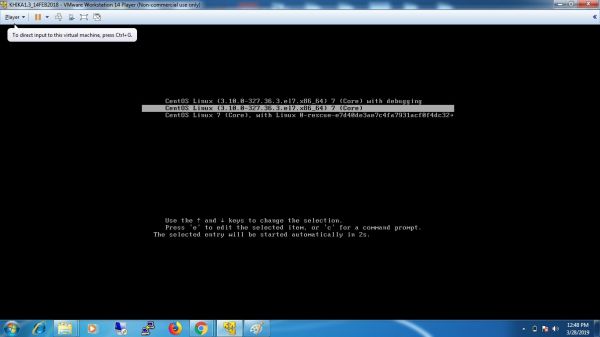
The VM shall boot after this step.
After booting successfully, you shall be prompted to login into KHIKA.
Allocate static IP Address
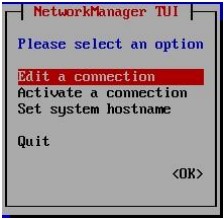
KHIKA is shipped as a Virtual Appliance with only one network interface by default, which is the 'loopback' interface with IP address of 127.0.0.1. This means, you cannot connect externally to this VM unless you provide an IPv4 IP Address to this VM. Assign a static IP address to each VM. All the data sources and configurations done further will refer to the VMs using their IP address only. Any change in this, shall make all configurations ineffective and incoming data may stop due to the same. Login using user name = khika and password = khika123 (default values) on the console terminal. At the prompt, enter command “sudo nmtui”. A “Network Manager TUI” pop up appears.
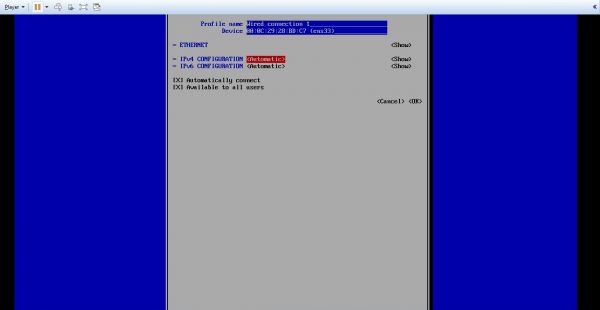
Select "Edit a Connection" and a pop up shall appear. Select the device (i.e. newly added network interface) that you have already added before booting the VM. Scroll to “Edit”
Following screen appears
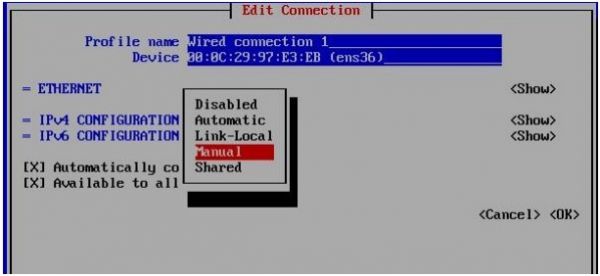
Here instead of Automatic, select “Manual” - since you have to provide a static address to this VM. We highly recommend you provide static IP to the ‘MARS’ Virtual Appliance. (You may select to provide an automatic IP address to your VM using the DHCP which is not recommended as this IP may change after a reboot. Using a DHCP assigned IP is not recommended as it may cause various connectivity issues in the future.)
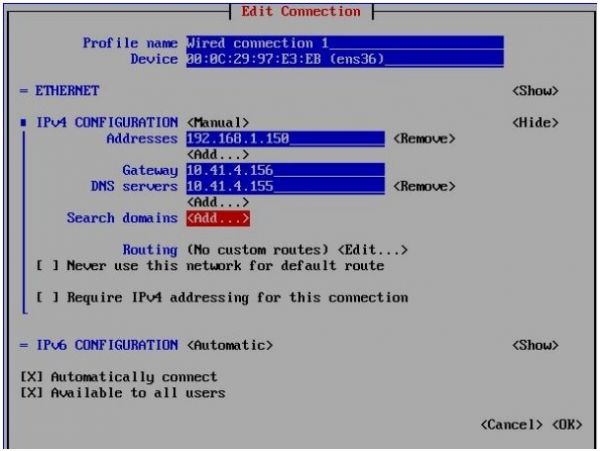
Provide IPv4 Address, Gateway, DNS Server and all other required details on this screen.
(Use TAB and Arrow keys to navigate)
You may need to consult your network administrator at this stage to get the correct IP Address to allocate to this VM, Gateway, DNS Servers etc
Select "OK" And "Quit”
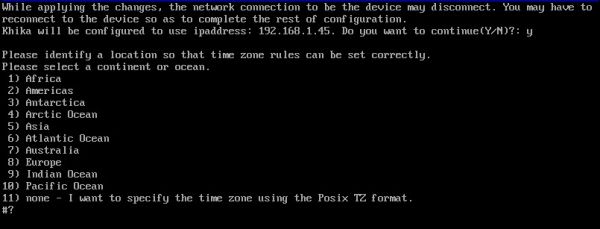
It will display a message “Khika will be configured to use IP address: 192.168.1.45. Do you want to continue(Y/N)?” (You will see the IP address allocated in previous step here)
Enter Y for Yes and KHIKA Application Server will be configured to use this particular IP. It will ask you to set time zone. Please enter appropriate value according to your time zone.
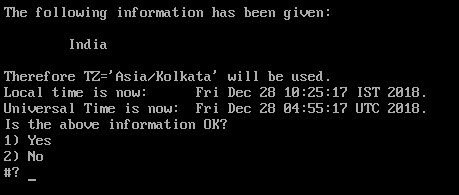
It will ask for time zone confirmation.
Enter 1 for Yes if time is shown correctly. After confirming the information, KHIKA will start automatically.
