KHIKA App for Apache WebServer
Apache Webserver run most critical business applications. Monitoring of Linux servers is important, from both security and operational standpoint.
With KHIKA App for Apache Webserver, you can :
- Monitor hundreds of servers at one central place.
- Monitor and shows the http error status for accessed URL on your server.
- Monitor and shows top accessed URL and count of hits on your server.
- monitor clientIP wise total request on your servers.
We explain below steps to configure and interpret the output of KHIKA App for Apache Webserver. The key parts to get here are :
- Install the KHIKA App for Apache Webserver
- Get data from your Apache Webserver into KHIKA Aggregator
How to Install the KHIKA App for Apache WebServer?
It is assumed, that you have already configured KHIKA Data Aggregator in your environment. If not, please read how to configure KHIKA Data Aggregator and perform the pre-requisite steps.
This section explains how to pick and install the KHIKA application for Apache WebServers. Installing the application shall put together and activate the adapter (parser) that can handle Linux data format, the dashboards and the alert rules preconfigured.
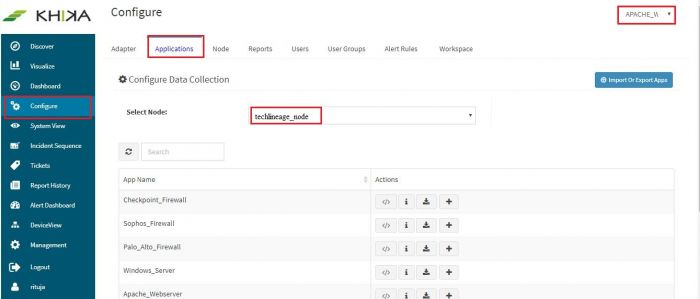
Go to “Applications” tab in the “Configure” menu.
Check whether the appropriate Workspace is selected. Note: Application is always loaded in a Workspace. Read the section on Workspaces to know more about KHIKA Workspaces. Also select your KHIKA aggregator name in the Node dropdown. This is to ensure that we are collecting data from the desired source and into the correct workspace which is ready with the configured application and components.
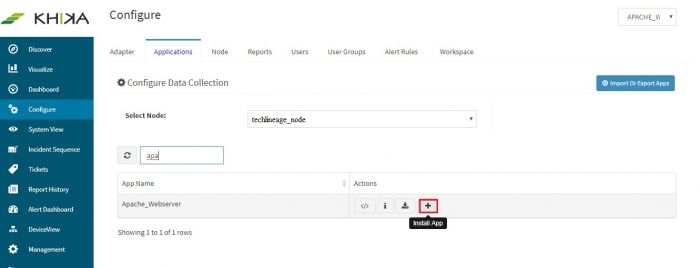
Click on the “+” button. A pop up appears.
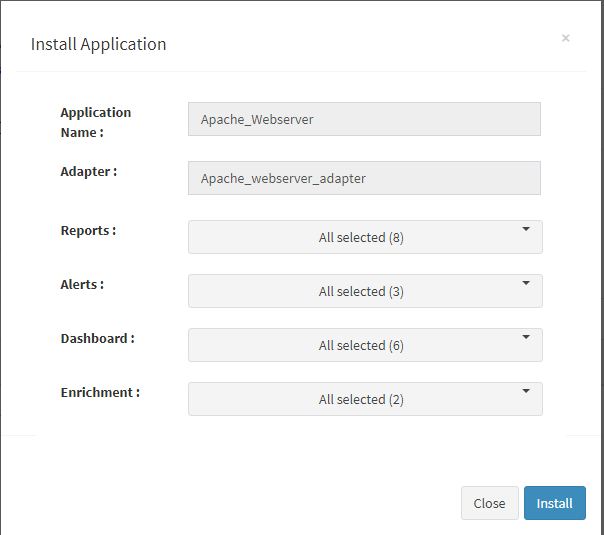
Users can now select the contents of the application required. For example, on the dropdown for “Reports”, click to expand it. List of all reports can be seen. User can individually select the reports required by checking on the checkbox next to each. Alternatively, check on “Select All” option to get all of them. Similarly you can select contents from Alerts and Dashboards.
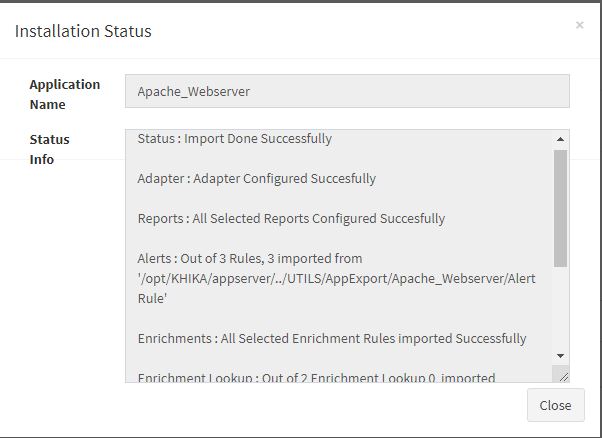
Click “OK” to proceed with the installation of the selected Application. After successful installation, following status should be displayed :
This simple procedure to install a KHIKA App, automatically configures the Adapter (required for parsing the data from raw syslogs), calculated KHIKA reports on raw data, Visualizations, Dashboards and Alerts – all in one click.
How to get your Apache Webserver data into KHIKA ?
KHIKA recommends, popular open source OSSEC integration to monitor the Linux servers. There are 2 components in OSSEC Integration with KHIKA.
- OSSEC Agent – Installed on each Linux server which we wish to monitor
- OSSEC Server – Present on KHIKA Data Aggregator (which you must install before)
The OSSEC agent and server communicate with each other using a unique key for encryption. The main steps to start getting data from a Linux server are
- Install Ossec agent on the Linux server
- Add the Linux server details in KHIKA
- Extract a unique key for this device from KHIKA
- Insert this key in the Ossec agent (ie. on your Linux server to be monitored)
- Reload Configuration
- Verify data collection
Each of these steps is explained in detail in the further sections.
Installing OSSEC Agent for Linux
Download OSSEC agent for Linux from here.
Copy the downloaded installer on your Linux server that you wish to monitor using KHIKA and run the installer with "root" credentials on the Server. Please Note : It is extremely important to install the OSSEC agent with "root" privileges as this agent reads the /var/log/security, /var/log/messages and some other important files. In order to read it successfully the ossec-agent process must be installed with "root" privileges.
You will have to run following command as "root" user to install the Ossec Agent :- Remove / rename ossec directory if already exists on the agent. ie. our Linux server. mv /opt/ossec /opt/ossec_bak
Go to the location where you have copied the Ossec agent installer mentioned above. Extract it using the following command tar –zxvf ossec_TL_Agent.tar.gz
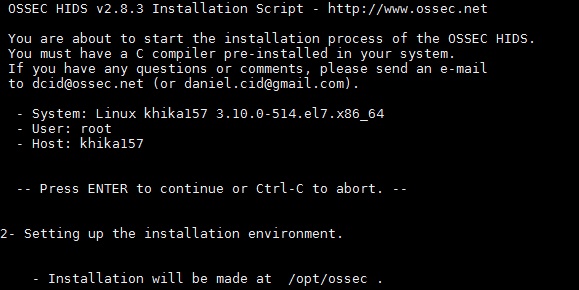
Then go to that directory using the cd command. You shall see a script by the name install.sh
Then Run following command. "sudo ./install.sh" (you need not do sudo if you have already logged in as root)
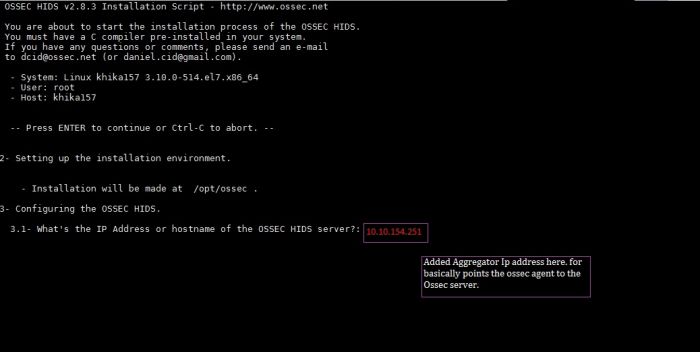
Now, add KHIKA Data Aggregator IP address (OSSEC server IP address) to point the OSSEC agent to the OSSEC server.
NOTE: You will have to repeat these steps on each of the Linux Servers that you wish to monitor using KHIKA.
