Difference between revisions of "KHIKA Reports"
Amit sharma (talk | contribs) (→How to receive reports via email) |
Onkar pawar (talk | contribs) (→Generating KHIKA Report Manually) |
||
| (8 intermediate revisions by the same user not shown) | |||
| Line 22: | Line 22: | ||
| − | [[File: | + | [[File:add_report.JPG|700px]] |
| + | |||
| + | [[File:add_report_details.JPG|700px]] | ||
| Line 41: | Line 43: | ||
|- | |- | ||
| Email Report To || (optional) Email id to send the report. | | Email Report To || (optional) Email id to send the report. | ||
| + | |- | ||
| + | | source type ||source type of the data source of report | ||
|- | |- | ||
| Advanced Settings checkbox || (optional but highly recommended) Click to go to the remaining tabs and add details. | | Advanced Settings checkbox || (optional but highly recommended) Click to go to the remaining tabs and add details. | ||
| + | |- | ||
| + | |sort required ||(optional) not using it | ||
|} | |} | ||
| Line 186: | Line 192: | ||
| − | [[File: | + | [[File:run_report.JPG|700px]] |
| Line 214: | Line 220: | ||
#Click Run. | #Click Run. | ||
| − | When you click “Run”, KHIKA Reporting engine triggers the KHIKA query specified in the “Search Filter” of the report and spawns the Script as a child process of KHIKA. The output of the KHIKA Query for the specified “Date and Time Range” is presented to the spawned report Script child process in the form of csv on its stdin. The script has all the logic to process the data and create another csv output that it writes on its stdout. KHIKA Reporting engine reads the stdout of the Script child process and stores everything in the Report History of that particular report. It will populate the report columns if you have defined it before. The report output will also be stored as a CSV file which you can download in future. If a report template is defined, appropriate output (such as PDF, Word, PPT etc) will be generated that you can download in future. If e-mail ID/s is/are configured, the report output (CSV and PDF/DOC/PPT) will be e-mailed to the recipients. | + | When you click “Run”, KHIKA Reporting engine triggers the KHIKA query specified in the “Search Filter” of the report and spawns the Script as a child process of KHIKA. The output of the KHIKA Query for the specified “Date and Time Range” is presented to the spawned report Script child process in the form of csv on its stdin. The script has all the logic to process the data and create another csv output that it writes on its stdout. KHIKA Reporting engine reads the stdout of the Script child process and stores everything in the Report History of that particular report. It will populate the report columns if you have defined it before. The report output will also be stored as a CSV file which you can download in future. If a report template is defined, appropriate output (such as PDF, Word, PPT etc) will be generated that you can download in future. If e-mail ID/s is/are configured, the report output (CSV and PDF/DOC/PPT) will be e-mailed to the recipients. |
| − | |||
== Report History == | == Report History == | ||
| Line 226: | Line 231: | ||
| − | [[File: | + | [[File:report_history_tab.JPG|700px]] |
| Line 232: | Line 237: | ||
| − | [[File: | + | [[File:report_hostory_section.JPG|700px]] |
| Line 255: | Line 260: | ||
|- | |- | ||
| || [[File:Irepo1.jpg|70px]] Download Report|| Downloads the generated report in the specified format (example. pdf, csv and so on). | | || [[File:Irepo1.jpg|70px]] Download Report|| Downloads the generated report in the specified format (example. pdf, csv and so on). | ||
| − | |||
| − | |||
|- | |- | ||
| || [[File:Irepo3.jpg|70px]] Delete Report|| Deletes report history. | | || [[File:Irepo3.jpg|70px]] Delete Report|| Deletes report history. | ||
| Line 268: | Line 271: | ||
| − | [[File: | + | [[File:download_report.JPG|700px]] |
Latest revision as of 09:49, 22 August 2019
Contents
Introduction
Some reporting requirements demand processing of the indexed data further using some high level programming language. The processed output can then be stored again into the “_rpt” index and visualizations and dashboards can be created on it. Essentially, reports are the programs or scripts that take indexed data from KHIKA as input and further process it to generate desired output. They can be scheduled to run daily or weekly or at a custom time.
Typically, a Report searches for specific data already indexed in the system. Each report is meant for that specific purpose. It is associated with a specific “lucene” query and a program capable of processing the output of the lucene query. KHIKA runs the query associated with the Report at scheduled time to filter the data from indexed data and presents the output to the program/script associated with the Report on its “stdin” in the CSV format. The program written in a high level programming language can implement any complex logic to perform computations on this data and create meaningful output in the CSV format. The program must write its output on its “stdout”. KHIKA consumes this output and stores it back in the “_rpt” index.
The data from the “_rpt” index can be used for visualization and dashboards.
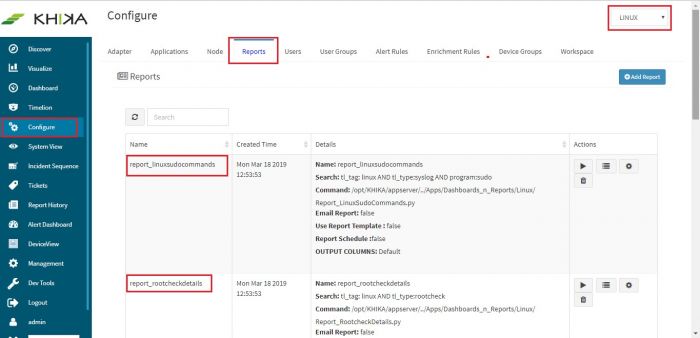
Go to Configure – Reports. Select the workspace from the workspace dropdown. You can see all the reports present in that workspace.
Adding a Report
Please Note: If you have begun by installing an Application for this data type, (Load KHIKA App section) then a set of inbuilt reports are pre configured as a part of the KHIKA application package.
To access Reports tab, from the left panel, click Configure and then click Reports tab. Select the workspace in which we have this data from the workspace dropdown on the top right. List of inbuilt reports for this data is displayed. We can schedule them, or see the history or manually run a report as explained in further sections.
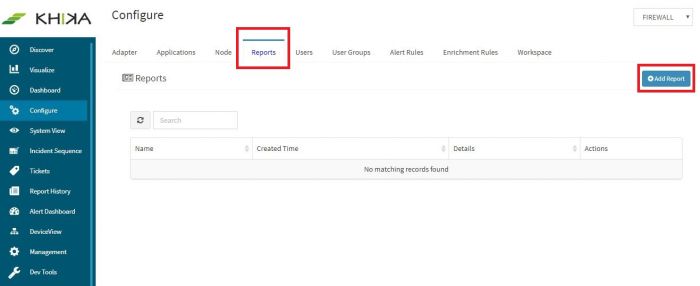
However, to manually add a new report in addition to existing ones, click Add Report button as shown in the following screen:
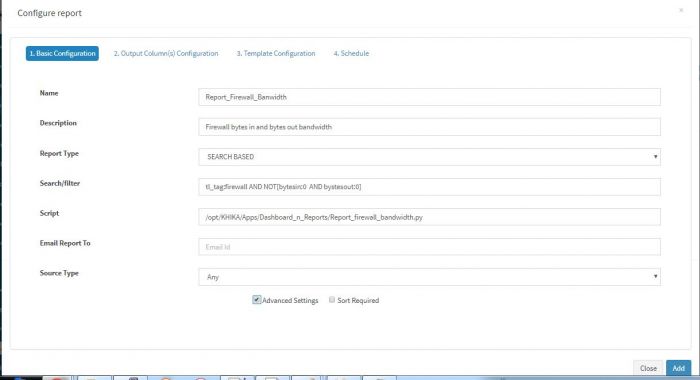
Following table lists the various fields in the Basic Configuration section of Add Report dialog box.
| Details | Description |
|---|---|
| Name | Name of the report to be generated. |
| Description | General description of the report. |
| Search/Filter | Search query to filter data as per requirement. |
| Script | Path of the report script. |
| Email Report To | (optional) Email id to send the report. |
| source type | source type of the data source of report |
| Advanced Settings checkbox | (optional but highly recommended) Click to go to the remaining tabs and add details. |
| sort required | (optional) not using it |
To add Advanced Settings to the Report, select 'Advanced Settings' checkbox. Once you select the checkbox, it enables the remaining tabs in the 'Add Report' dialog box.
How to receive reports via email
One of the most used features of KHIKA Reports is that on-demand, daily or weekly scheduled reports can be sent to respective relevant stakeholders by email. You need to configure SMTP settings in KHIKA before sending reports by e-mails. Please refer the SMTP Server Settings for further information on how to do this.
Click Basic Configuration tab and enter the values in each of the fields. Steps for adding values to Basic Configuration:
- Enter the Name of the report to be added.
- Enter general Description of the report.
- Enter a Search string (conforming to KHIKA query language).
- Enter the path of the report Script.
- Enter the Email id to send the report (if you have multiple e-mail recipients, separate the e-mail IDs with semicolon)
- Click Add. The details are added successfully.
First four fields are essential fields for a KHIKA report.
Basically, a KHIKA report consists of a “KHIKA Query” and a “Script/Program”. When you run a KHIKA report, you always supply a time range for which you want to run the report. KHIKA Reporting Engine spawns the Script/Program as a child process of KHIKA and simultaneously fires the “KHIKA Query” configured for the report to fetch all the data for the specified time range. KHIKA presents the data as input to the report Script/Program on its stdin in the form of CSV. The script/program must be capable of processing the CSV input received on stdin from KHIKA and produce the desired output post processing on stdout in the form of CSV. As KHIKA spawns the reporting Script/Program as a child process, it can easily communicate with it using simple “pipe based” inter process communication mechanism over stdin/stdout. This enables report developers to develop reports of any complexity using any programming language they are comfortable with. Most of the KHIKA reports shipped out-of-box are coded in python language. You are encouraged to study some of the reports stored in /opt/KHIKA/Apps/Dashboards_n_Reports directory. “KHIKA Query” for the report is nothing but a Lucene search string conforming to KHIKA Search Grammar explained in chapter “Working with KHIKA Search”
If you have selected “Advanced Setting”, you will presented a page to input further information for the reports.
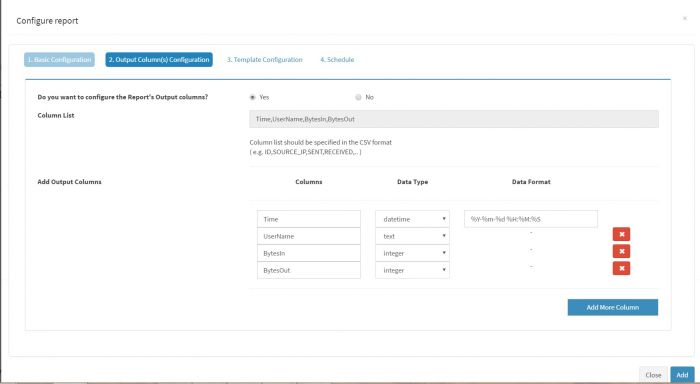
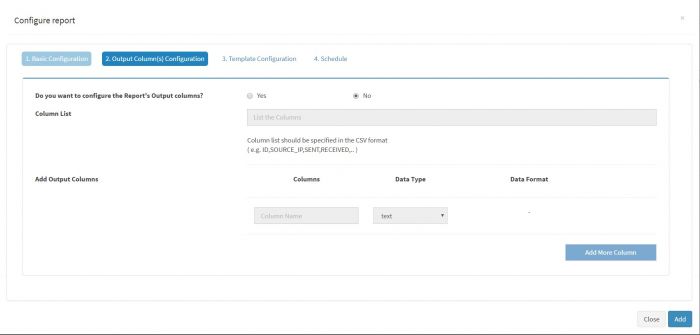
Following table lists the various fields in the Output Column(s) Configuration section of Add Report dialog box.
It is important to identify all the output columns of a KHIKA report and map to appropriate data type (such as text, integer or date). This information ie. The field names and their values shall reflect in the “_rpt” or calculated report index in the database.
| Details | Description |
|---|---|
| Column List | Default list in the report configuration column. |
| Add Output Columns | Manually adds more fields in the Output Columns. The Columns field specifies the name of the column. Data Type could be an integer, text or datetime. Data Format specifies the format of the Data Type. (The Data Format is applicable only to the datetime field).
Note that the name of the column must match the output of the report script. Also, the Data Type must be consistent with the output of the report script, especially the numeric and date fields. |
| Add More Column | Adds the required number of columns. |
While configuring the columns manually, you are expected to know the output columns' names and their data-types. If you are not sure about the output columns of a particular report it is best to leave it blank to begin with. In such cases, KHIKA will treat all the output columns as text. You can run the report once and download the CSV output to study the columns. With a sample output in your hand, you may edit the report columns easily.
Steps for adding values to Output Column Configuration:
- Click Output Column(s) Configuration tab and select Yes for configuring the Report’s Output Column.
- Add the Output Columns one-by-one. Specify the Column list in the CSV format only. Click Add More Columns, for adding the required number of columns.
- Click Add. The details are added successfully.
Please Note: To configure the Report’s Output Column, select Yes and manually enter the values. When you select No, it will automatically take the default system values and disable all other fields. Please see Figure 3 below. We highly recommend you to input the columns properly right at the time of configuring a report. If you do not configure the report columns here (by selecting No), KHIKA will treat all the output columns as text.
You may configure report template if you wish to share the reports using PDF/MS Word/MS Power Point format.
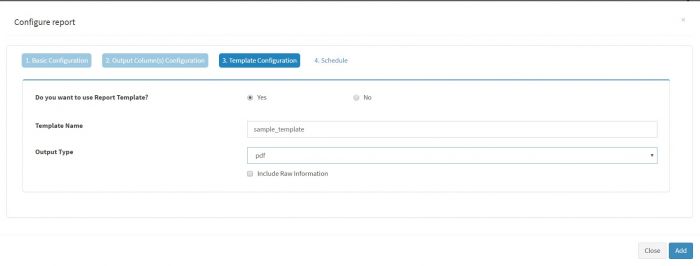
Following table lists the various fields in the Template Configuration section of Add New Report dialog box.
| Details | Description |
|---|---|
| Template Name | Name of the report template. There should be no space in the template name. |
| Output Type | Select the type of output required for the report from the drop-down list. If nothing is selected, it will automatically give the output in the CSV format. |
Please note: When you select Include Raw Information check box, it generates the output in CSV format as well as any other format (PDF,Word, PPT) that you select. You can convert KHIKA reports into PDF, MS-Word, PowerPoint etc. You will have to configure a report template if you need the report output in any of these formats, in addition to default csv format. Note that you will have to design and compile the report template using Jasper Studio 5.6.2 (or higher version) and deploy the “.jasper” file in: /opt/KHIKA/Apps/Dashboards_n_Reports/Report_Templates directory.
Steps for adding values to Template Configuration:
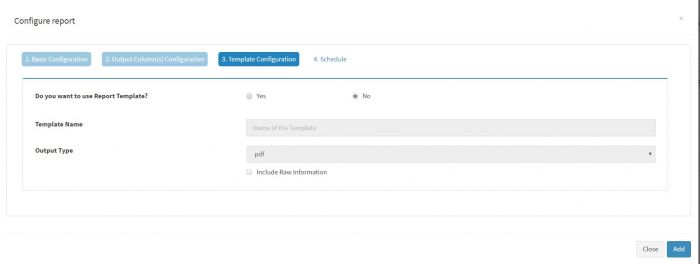
- Click Template Configuration tab and select Yes for using Report Template. If you do not want to use the template, select No.
- Enter a Template Name. (Note that the Template is a "Jasper" template and the pre-compiled. jasper file must exist in /opt/KHIKA/Apps/Dashboards_n_Reports/Report_Templates. For Example: If name of a report is win_user_account_login_report and corresponding compiled jasper template file is with the name win_user_account_login_report.jasper, then you will have to enter the name of template as win_user_account_login_report (omit the .jasper extension)
- Select the required report output from the Output Type drop-down list.
- Click Add. The details are added successfully.
Please note: To configure Template Configuration, select Yes and manually enter the values. When you select No, it will automatically take the default system values and disable all other fields. Please see figure below.
Scheduling Reports
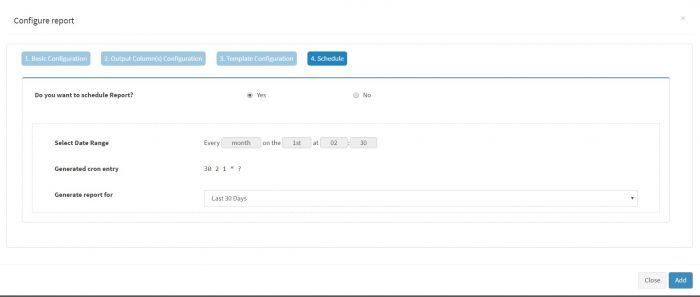
The next tab allows you to schedule the reports to be run by KHIKA at the desired frequency. Select “Yes” radio button to schedule the report.
Following table lists the various fields in the Schedule section of Add New Report dialog box.
| Field | Sub Section | Description |
|---|---|---|
| Select Date Range | Select the date and time for scheduling the report. Reports can be scheduled either on hourly, daily, weekly, or monthly basis. | |
| Schedule Type: Hourly | Schedules the report to run every hour. You will have to specify “minutes of hour” indicatting exactly at what minute of the hour the report has to run. In the “Generate report for” option, you will have to select whether the report has to run on “last 60 minutes” or for “previous hour”.
Note the subtle difference between “last 60 minutes” and “previous hour”. For example, if you have selected the report to run at “15” minutes past the hour and selected the option of “Last 60 minutes”, KHIKA will run the report every hour at decided minute (i.e. 01:15, 02:15, 03:15 …etc) and process the data gathered in its repository in last 60 minutes (example: for the report that runs at 02:15, the data will be processed from 01:15:00 till 02:14:59) Now consider that you have selected “Previous hour” for “Generate report for” option. In this case, KHIKA will run the report for hour at decided minute (i.e. 01:15, 02:15, 03:15 …etc) and process the data for “last hour” (example: for the report that runs at 02:15, the data will be processed from 01:00:00 till 01:59:59) | |
| Daily | Schedules the report to run everyday at the specified time (in hours and minutes). The report can be configured to process events 24 hours prior to the scheduled time or since midnight of that day. | |
| Weekly | Schedules the report to run on a particular day of a week and at the specified time (in hours and minutes). | |
| Monthly | Schedules the report to run on a particular day of a month and at the specified time (in hours and minutes). | |
| Generated cron entry | This will be auto populated. | |
| Generate report for | Select the value from the drop-down list. This depends on what you select in the Date Range field. |
Please note: To schedule the Reports on given date and time, select Yes and manually enter the values. When you select No, it disables all other fields.
Steps for adding values to Report Schedule:
- Click Schedule tab and select Yes for scheduling the Report.
- Enter the Date Range as per requirement.
- Select the time period for scheduling the report from the drop-down list.
- Click Add. The details are added successfully.
Most of the KHIKA customer select to schedule the reports to run at “daily” frequency and they generate the report for “previous day”. Reports are schedule to run at off business hours.
Generating KHIKA Report Manually
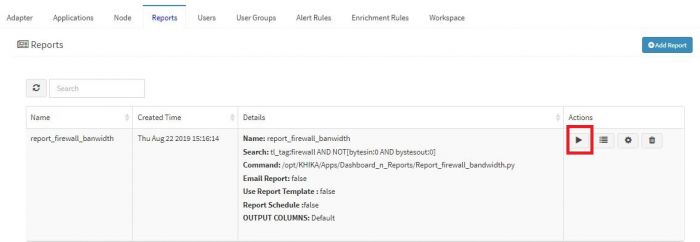
This section explains how to run a desired report manually and generate its output. Reports run as per scheduled but you can run them manually in case of specific requirement. To access Reports tab, go to the main screen, click the left side menu bar. Click Configure and then click Reports tab. To manually run the Report, click the Run This Report Once button as shown in figure below.
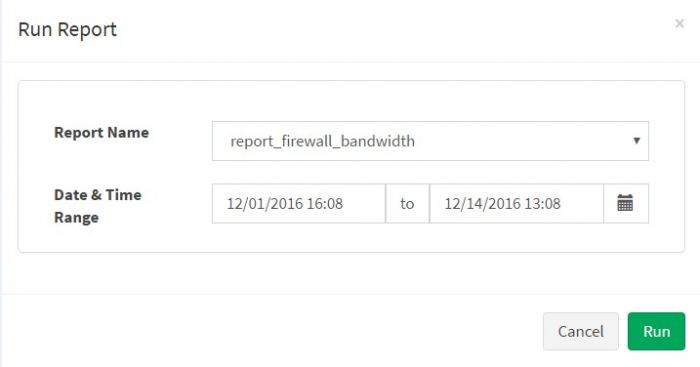
The following screen is displayed.
Following table lists the various fields in the Run Report window.
| Details | Description |
|---|---|
| Report Name | Name of the report. |
| Date and Time Range | Date and Time the report should run on. |
Steps for generating reports:
- Select the Report Name from the drop-down menu.
- Enter the Date & Time Range for generating the report. You may select the date, hour and minute in Date and Time Range option. (Note that long time ranges will exert a lot of load on KHIKA and reports may take long time to finish)
- Click Run.
When you click “Run”, KHIKA Reporting engine triggers the KHIKA query specified in the “Search Filter” of the report and spawns the Script as a child process of KHIKA. The output of the KHIKA Query for the specified “Date and Time Range” is presented to the spawned report Script child process in the form of csv on its stdin. The script has all the logic to process the data and create another csv output that it writes on its stdout. KHIKA Reporting engine reads the stdout of the Script child process and stores everything in the Report History of that particular report. It will populate the report columns if you have defined it before. The report output will also be stored as a CSV file which you can download in future. If a report template is defined, appropriate output (such as PDF, Word, PPT etc) will be generated that you can download in future. If e-mail ID/s is/are configured, the report output (CSV and PDF/DOC/PPT) will be e-mailed to the recipients.
Report History
KHIKA Reports are typically scheduled to run at a periodic interval or can be run on-demand. The “Report History” tab shows the when the report was run. One may download the CSV output of a specific instance of the report from here.
To access a particular Report, click Configure and then click Reports tab. Select the workspace in which the required report is present.
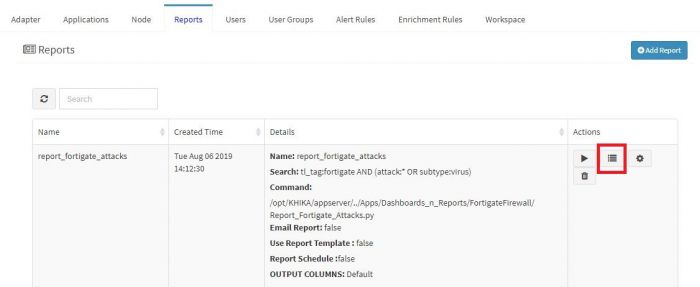
List of Reports in that workspace is displayed. To view the history of the Report generated, click the History icon as shown in figure below next to the desired Report.
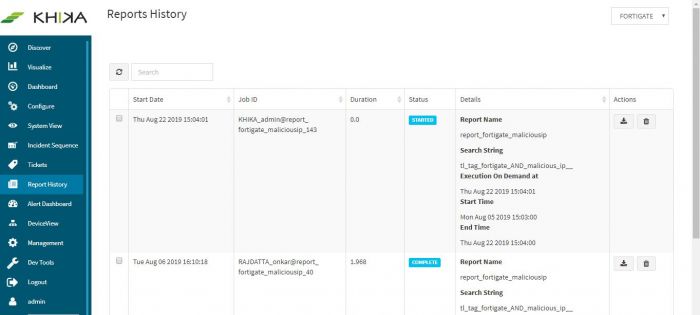
The following Report History screen is displayed.
Following table lists the various fields in the Report History dialog box.
Downloading a Report
To access Reports tab, go to the main screen, click the left side menu bar. Click Configure and then click Reports tab. To download a Report, click the Download Report icon as shown in figure below.
The Report is downloaded. Reports are saved as CSV files and are best viewed in MS Excel, Open Office or equivalent spreadsheet programs.
Refer to the next section for KHIKA Alerts & Correlations
